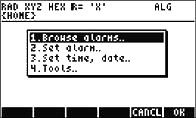
HP 50g Calculator - Setting Time and Date

The calculator has an internal real-time clock. This clock can be continuously displayed on the screen and can be used for alarms, as well as running scheduled tasks.

This document explains how to set time and date.

To set time and date:
  1. Press . The TIME choose box is shown in the figure below:

    Figure 1: TIME Choose Box

  2. Press 3 followed by the soft menu key. The ‘SET TIME AND DATE’ input form is displayed.
  3. Use the number keys to type in the time in hours, minutes, and seconds. Press the key to enter numbers into the fields.
    NOTE: After pressing the key, the cursor moves to the next field in the input form.
  4. With the field to the right of the seconds field highlighted, press the key to scroll through the options and set the time. The displayed setting is the active setting. The time options include the following:
    • AM
    • PM
    • 24-hour time
  5. Press the key to highlight the date format field. The default format is M/D/Y (month/day/year).
  6. Press the key to toggle between the date format settings.
  7. Use the arrow keys to highlight the other fields for the date.

  8. With a field highlighted, use the number keys to type in the date in the selected format and press to enter the numbers.
  9. With the date entered, press to save your settings and exit the 'Time' menu.